

When I reach for a roll of film in my refrigerator, I pay attention to the ISO rating and set my camera accordingly. When it is time to develop that roll of film, I look for recommended developing times provided by the film manufacturers. If those aren't provided for the developing I'm using, I look to the online Massive Development Chart.
But what if the Massive Development Chart either lacks the information I need or provides information that proves to be wrong? And what if my film's ISO rating isn't accurate for the workflow that I have? What do I do now? The answer is to channel my inner Ansel Adams and conduct a series of tests to determine my film's actual exposure index and developing requirements.
Because I have been experimenting with a home-mixed developer, D-23, which is no longer a commercial developer and is not widely used, I needed to perform tests to determine the proper developing time for (in my case) Fomapan 100 in D-23 (or any film and developer combination). As always, Wayne was an invaluable resource, and in this show, Wayne and I present a testing workflow that will provide useful and reliable information regarding exposure index (the working speed of a particular film based on your workflow), printing times, and film development times. As a companion to the podcast, Wayne has written out his testing procedure, and I included at the end of this post. We hope you find it useful.
Speaking of Wayne, he is thinking about 35mm cameras. Yes, you heard right! Wayne is anticipating the day when he will not be able to carry around his large format gear, and carrying around a 35mm camera will be his medium of choice. But he has a dilemma. Should he use his Pentax KX camera and the extensive system he has built around it, or should he use his newly-acquired Canon FTb, which he came as a gift and has very much captured his fancy. We break down the advantages and disadvantages of each, and we also ask for your input, which you can give by sending us an email to unclejonesyscameras@gmail.com.
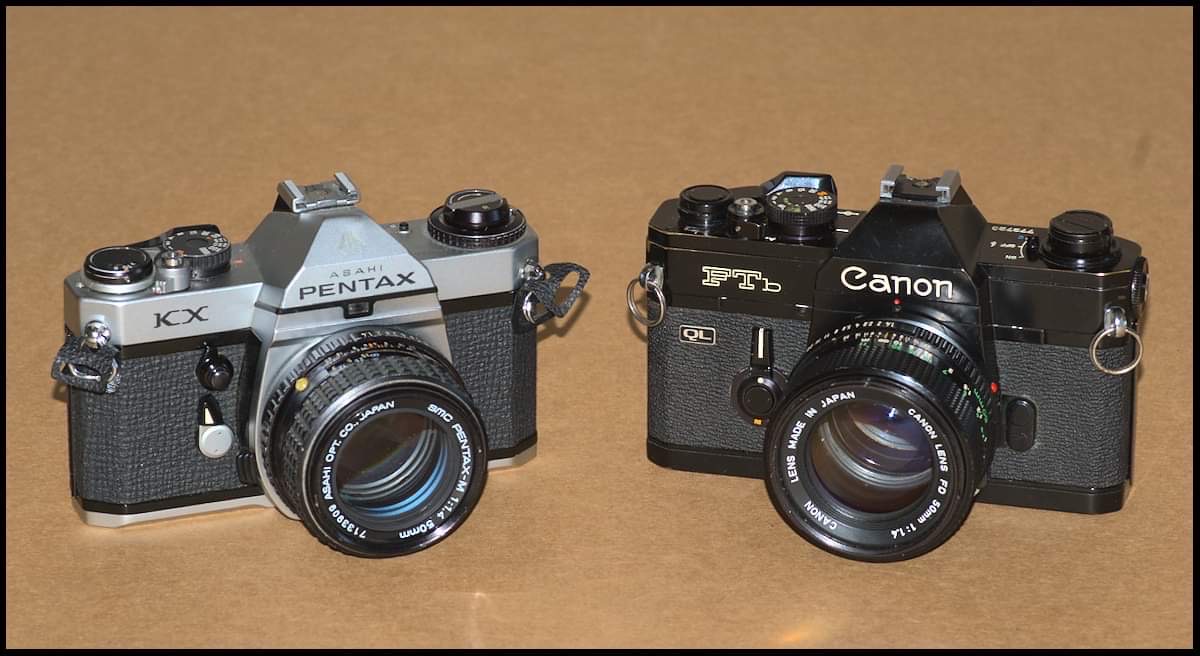 |
| Pentax KX or Canon FTb - Help Wayne Decide! |
Finally, we read some listener email, including one from Professor Paul "Bear," in which he describes his "Bear-a-Fied" cutting device that cuts 4x5 sheet film down to 3x2. You can see pictures of this device below.
 |
| How do you down 4x5 sheet film down to fit in a 3x2 film holder? Professor Brown knows how! |

Happy Shooting!
Wayne's Guide to Film Testing
Speed Test: This is to determine your system film speed or Exposure Index (EI). You’ll be making a series of Zone I (the first appearance of tone above black in a print) exposures from 2 stops under to on stop over the film’s rated ISO. You’ll need a roll of film, a smooth neutral tone subject (a gray or black mat board works great), someplace with consistent, soft, even light and your camera mounted on a tripod.
- Load your camera and attach it to the tripod positioned so that the target fills the entire frame and focus to infinity.
- Take a meter reading and select a shutter speed and f/stop in a combination that lets you use f/2.8 or f/2. That way you can make all your adjustments using the f/stop instead of shutter speed.
- Stop your lens down 6 stops, you should be as f/16 or f/22 depending on you initial setting.
- Make a series of 10 exposures following the chart below.

- Once you finish this, you can either finish the rest of the roll normally or go ahead and develop it.
- Develop the in your standard developer using manufactures recommend time/temp and agitation.
- Once dry, compare each exposed frame to the adjacent blank frame looking for the first exposure that gives you a slight but noticeable density above the film base. The exposure that produced that exposure is your EI. It’s probably, but not always, going to be less it’s rated ISO.
Print Test: This determines the minimum exposure time to get maximum black on a print by making a test strip of the negative that gave you your EI.
- Set your enlarger to a convenient height.
- Put your EI negative in the carrier so that its edge is in the middle of the frame (the frame should be roughly half exposed film and half clear film).
- Focus the negative and stop the lens down about two stops.
- Make a test strip along the border of the exposed and unexposed film.
- Once dry, look for the exposure that shows a slight but noticeable difference between the exposed and unexposed film. You may need to make several test strips using different base times and intervals to find the best exposure, when you do, that is your print exposure time.
Developing Time Test: This test helps you determine the developing time that gives you good detail in the highlights by making identical exposures at your system EI and developing at different times. You’ll need a roll of film (preferably 36 exposures), a light-colored textured subject (a clean white towel works great), direct light that brings out the texture of your target, and your camera mounted on a tripod.
- Set up your target in the direct light so that there is visible texture and position the loaded camera and tripod so the target fills most of the frame.
- Carefully focus on the target, you want to see the texture.
- Set you meter to your newly determined system EI, and meter you target.
- Set you camera to overexpose 2 stops (open up 2 stops or divide shutter speed by 4).
- Expose entire roll at the same setting.
- In the darkroom or changing bag cut the exposed film into 5 pieces, load one strip onto a developing reel and keep the others dark.
- Develop the first length of film for the manufactures recommend time/temp and agitation.
- Individually develop the remaining lengths of film:
- One for 15% less time (multiply original time by 0.85)
- One for 30% less time (multiply original time by 0.7)
- One for 15% more time (multiply original time by 1.15)
- One for 30% more time (multiply original time by 1.3)
- Once dry make a print with the same elevation and f/stop you used in the Print Test at the time you determined in the test.
- Evaluate each print looking for the one that best shows a white subject with distinct texture, that’s your developing time. If it looks like one is too light but the next one is a bit dark, average the times.
No comments:
Post a Comment