Monday, December 24, 2018

UJC #6: A Sack Full of Cameras

It’s Christmas Eve, and Old St. Nicholas is getting ready to open his sack of goodies and give presents to all the good girls and boys. And if you've really been good, Santa is going to give you a brand new (old) film camera.
A Zenobia, a Yeshiva Mat 128 G, and a Petri 1.9, gifts all.
So get ready as the Shutter Brothers run down some of their recent camera acquisitions, including three really cool cameras that have been given to Kelley recently, a Zenobia, a Petri 1.9, and a Yashica Mat 128 G (isn't he so lucky!). Kevin talks about a recent antique store find, the Canon Canonet 28 (big things come is small packages), and both Kelley and Kevin talk about how instant photography is perfect for the holidays.

The Canon Canonet 28
The Uncle Jonesy's Cameras Podcast is available on all your favorite podcast directories. Please consider subscribing to the podcast. Also, we would love to hear from you, so please email us at unclejonesyscameras@gmail.com. Send us a voice memo and be a part of the show. And thanks to all of you who have listened to the podcast, read an article on this blog, and/or visited our Facebook page. We are grateful for each and every one of you.

Happy Shooting!

Instant Christmas Magic

*** This Post Comes From Kevin Lane ***

Ok, I'll admit it. I love this time of year. Yes, I know it has it's stresses, and I hate the obsession with "things that will make you happy." I've reached the stage in my life when the value of relationships becomes paramount, which is why this time of year has so much meaning to me. My favorite thing about time of year is getting together with family and friends to eat, drink, laugh, love, and celebrate "togetherness." It's something I look forward to all year.

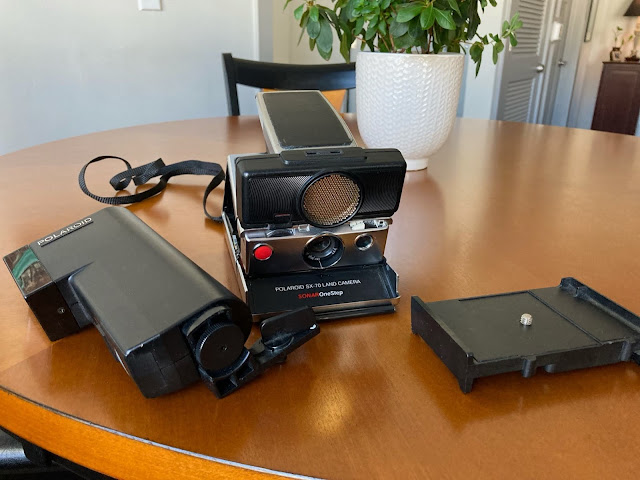
So, it should come as no surprise to anyone at these gatherings when the cameras come out. While everyone else is shooting with their camera phones, I will be firing my flash and capturing holiday memories on film. I say "cameras" because usually I shoot more then one. And one of those cameras likely will be my Polaroid SX-70 SONAR.
I love using this camera at parties, partly because of the amazement it creates when people hear it fire and see that piece of film eject from the front, but really for another practical reason. People can see the photograph moments after I take it. And more often than not, that photograph will go home with them when they leave and end up being displayed somewhere in their home. You don't always get that with a photo from a phone.

My Polaroid SX-70 SONAR One Step camera and Polatronic Flash, all from 1977.


My youngest daughter, Megan, and her guy, Devin, taken on Polaroid
Originals SX-70 color film

On show #6 of the Uncle Jonesy's Cameras Podcast, Kelley and I discuss why instant photography is a perfect choice for the holidays, especially if you are a film shooter. Everyone is super-busy this time of year, and finding time to develop your holiday party film isn't easy. Shooting an instant camera solves that problem, not to mention the cool gifts the photos become when you give them away. It truly is better to give than to receive.

You have two choices for instant photography:  FujiFilm Instax and Polaroid Originals. Instax cameras and film are everywhere nowadays and are very popular with young people. There will be thousands of Instax cameras found under the tree on Christmas morning. The photos (ten to a pack) develop quickly and look good. The film can be purchased at your local drug store. With Polaroid, it's a bit different. First of all, the Polaroid Originals film is more expensive than Instax film, and it produces only eight shots.  The Polaroid Originals film takes longer to develop (especially the color film), and the quality can be uneven (again, especially the color film - the black and white film looks great). Second, you have the option of using one of the thousands of vintage Polaroid cameras that can be found in antique store, thrift stores, closets, online, all waiting for a fresh pack of film to bring them to life. My SX-70 SONAR dates back to 1977. I also have a 600 OneStep Close Up, which I rarely use, because the SX-70 is a much better camera - easily the best camera Polaroid ever made. For this reason, there are not as easily found as the 600 type cameras like the OneStep Close Up, which has a lot of plastic about it, including the lens. However, you are much more likely to find 600 type cameras as all of the above-mentioned places. The big question regarding vintage Polaroid cameras is:  Will it work when you insert a fresh film pack into it? Unless the person who is selling the camera can confirm that it has been tested and is working, the only was to know is to do is to try it out. If it powers up, great. If not . . . I keep empty film packs that still have good batteries to test cameras with, and after you successfully shoot your first pack, you will have one, too. 

Of course, you purchase a brand new Polaroid camera, the Polaroid Originals OneStep 2, which was introduced last year. The OneStep 2 looks similar to previous 600 type cameras, but it has a lot of updated features like an onboard rechargeable battery, which makes the battery in the film pack no longer necessary. The camera has gotten some good reviews, and because the I-Type film packs the camera uses don't have a battery in them, they are about three dollars less than SX-70 or 600 packs. Unless you already have access to a vintage camera or are "vintage-minded," a new Polaroid camera may be the best was to go. If something goes wrong with the camera, you can return it for another one. 

As far as buying Polaroid Originals film, your best bet is to plan ahead and order online. However, if you like to be spontaneous, you can usually find the I-Type and the 600 film at Target and Barnes & Noble stores (although yesterday both stores were completely sold out of film and cameras due to heavy holiday demand). Unfortunately, neither of these retailers sell the SX-70 film. There is a workaround, however. Polaroid Originals makes a reusable neutral density filter that fits onto the top of a 600 film pack, so that the much faster 600 film will not be overexposed when used in an SX-70 camera. 

Instant photography is a great fit for this time of year, and the photographs you make will become treasured keepsakes for many years to come. Whether it's FujiFilm Instax or Polaroid Originals, get yourself and camera and some film and start capturing memories.

Sunday, December 9, 2018

It's Always Darkest Before the Solstice

Today's Post is from Kevin Lane

Today is Saturday, December 8, 2018, and the weather outside could not be more gloomy. The rain has fallen all day long, and the temperature has hovered at 40ยบ. It could not be a worst day for outdoor photography, so as my cameras sat idly on the shelf, my wife, Debbie, and I hung our outdoor Christmas decorations during a moment of light drizzle. As I write this, we are relaxing in our cozy and warm living room listening to Christmas jazz and writing Christmas cards. Candles are glowing, and soon we will begin preparing a nice romantic dinner and choose from our holiday-related movies list. A nice Saturday despite the lousy weather.

It was only a few days ago that I was thinking about my photography goals for 2019, specifically about how one of those goals was to remain active even in the dreariest portions of winter. A day like today shows how difficult is may be to attain this goal here in northwest Georgia, as today is a typical winter day in this region. Winter here is usually wet, but not usually cold enough for snow. There are exceptions, however, and it is not unusual to get at least one snow of a few inches - just enough to close schools and give us school teachers a welcome day off. But a typical winter in north Georgia is cold, wet, and dreary - not a great mix for photography.

Nevertheless, I plan to shoot more film this winter than I ever have before. I specifically want to capture the winter mood - bare trees, dead vegetation, muted shades of gray, etc. I never used to see the beauty of the winter mood, but Debbie has been a big influence on me. She loves to see bare trees against the winter sky, and I have to admit that I have begun to see the winter light in a new way - the subtle shades of gray, the muted colors, the lack of shadows on overcast days. I'm thinking that this would be great weather to get in close on subjects and capture architectural details that stand out more in low contrast light, like weathered wood, stonework, old ironwork, peeling paint, and reflections in windows. I am excited about the possibilities.

I think winter is a good time to practice becoming your own light meter. If you understand the "Sunny f16" rule,* then you will be opening up your exposure settings by two stops for cloudy but bright days with little or no shadow three stops for heavy overcast, and four stops for deep shade or sunset light. I make careful note about the amount of light and choose what I think would be the best exposure. However, to improve my skills, I will make two or three exposures of the same scene cloudy day scene - one at two stops open, one at three, and maybe one at four. This is called "bracketing," and the idea is that, in all likelihood, one of the exposures will be the best. When I bracket, I always go from more closed to more open so that, when see the negatives and scans later, I can compare the results to what I was thinking at the time (although I don't usually do this, it would really help to make field notes when shooting. Perhaps I will add "make field notes" as a new goal for 2019 . . .) With practice, I hope to gain confidence in my "eye-metering." Of course, I could use my camera's meter or the myLightmeter Pro app on my iPhone, but the essence of photography is understanding light, right? And light meters can be fooled in some situations.

Speaking of light, one of the practical problems with winter photography is dealing with short days. I leave for work before the sun rises (school teacher, remember?) and often don't get home before it starts to get dark. But here is an encouraging thought:  December 21 is the Winter Solstice, the shortest day of the year. Technically, winter begins that day, but the daytime will begin to increase slowly but surely. Since I carry a loaded camera with me pretty much all the time these days, I am going to get more and more opportunities to capture the winter mood and the winter days pass. Seize the winter day . . .

Although shot in early November, it was a cold, rainy day when I stopped on my way
home from work to photograph this old abandoned barn. Holga 120N with Ilford HP5+,
home processed.
As I walked around this old barn, I found an interesting arrangement of truck parts that
deserved to be captured on film. Holga 120N with Ilford HP5+, home processed.

It certainly was cold and snowy, but I love the contrast between
the subtle colors of the light son this street in Bergen, Norway,
 and the various shades of gray. Minolta 7s with Kodak Gold 200, home processed.

The light from the overcast sky brought out details that would have
been lost in the direct lighting of a sunny day in Bergen, Norway.
Minolta 7s with Kodak Gold 200, home processed.

*On sunny days for subject in bright sunlight, exposure will be f16 for aperture and whatever your film speed is for shutter speed. If you open up one setting, then close ("stop") down the other setting with the same number of stops. For example, if you are shooting ISO 100,  f11 and 1/125 work, as does f8 and 1/250, f5.6 and 1/500, and f4 and 1/1000. There are exceptions, of course, such as white subjects (close one stop) sidelit subjects (open one stop) and backlit subjects (open two stops). I suggest memorizing Sunny f16 stop combinations for your favorite films. You will be much faster at setting your exposure on your camera once you have "eye-metered" the scene.

Saturday, December 1, 2018

We're on Facebook!

You can now find the Uncle Jonesy's Cameras Podcast on Facebook by searching @ujcpodcast. Kelley and I will use this page to post day to day photography activities that you may find interesting but do not merit an entire blog post. We also will post news relating to the podcast and the blog here as well.

Both Kelley and I are a little leery of making use of Facebook as a platform for the podcast and blog, as there is so much negativity on Facebook these days. Neither one of us spend a great deal of time there except to keep up with family and follow the various music and photography pages and groups we like to read. And neither of us felt like creating a Uncle Jonesy's Cameras Facebook group was a good idea at this time. Perhaps that will change in the future, but for now it is simply a place where you can keep up with us more often than what you will see in this blog. We hope you enjoy that, as you are the reason this blog and the podcast exist.

Happy Shooting!

Monday, November 26, 2018

UJC #5: Brick, Black, Cook, and Book

The Shutter Brothers (Kelley and Kevin) are back with show number 5. Do we talk about cameras? Of course, we talk about cameras! Kevin shares his newfound love for the venerable Argus C3, while Kelley takes a close look at his latest flea market find, the very cool Konica Autoreflex TC. And we cover a developing story - about developing color film. It's a process known as C-41, and temperatures are crucial to success. To that end, Kelley discusses using his new sous vide to control temperatures, while Kevin sticks with his "stove-top" method. Finally, Kelley reviews a great photo book by the legendary Gary Winogrand.

You can find our podcast at all of your favorite podcast directories including iTunes, Google Music, and Spotify. We would love to hear from you, so please email us at unclejonesyscameras@gmail.com. Enjoy, and don't forget to subscribe.

Thursday, November 22, 2018

The Argus C3 - So Why Not?

Today’s post comes from the very impressionable Kevin

I am an avid reader of film photography blogs, and I use Feedly on iOS and Mac OS to keep up with the latest posts. I love being inspired by the photographs I see and the stories about how they were made. I also enjoy reading about cameras, especially cameras that have historical significance. So, it will come as no surprise that a recent post that mentioned the venerable Argus C3 caught my interest in a big way. After all, the Argus brand name was a household word to my brother, Kelley, and me, as our Uncle Jonesy's first Camera was an Argus Autronic 35. We would later learn that Argus was much more well-known for it's first camera, the Argus A, and its wildly-successful succcessor, the Argus C3. Internet searches will say much about this legendary American made rangefinder camera:  that its nickname is “the Brick,” that it is known as the Model T of American cameras, and that they were made and sold in the millions. And because they are so well, built, there probably are millions still in existence today.

If you were an American amateur photographer in the 1940's and 1950’s with an average income, chances are you used a version of the Argus C. It was much more affordable than German cameras such as the Leica, the Rolleiflex, and the German-made Kodak cameras, and with the rise in popularity of 35mm film, the Argus C became “the” American camera. The easy breakdown of the models goes like this:

1938 - Argus C:  Uncoupled rangefinder
1939 - Argus C2:  Coupled rangefinder
1938 - Argus C3:  Flash contacts on side (by far the most popular model).
1958 - Argus C3 Matchmatic:  Meter accessory and simplified exposure system

Argus C3 cameras are plentiful and easy to find today. Although the cost of a working C3 is rising (pretty much like all film cameras these days), they are still relatively inexpensive. Even so, I had never used one before. So, after reading about the C3, I thought, “Why not?” I couldn’t help thinking about how much fun it would be see what kind of images this historic camera could make. After all, I’m in this hobby for the fun of it.

I didn’t have to go far to find a C3, because I knew that Kelley owned one. I asked him if I could give it a try, and he gracious said yes. He brought it to my house, and I quickly learned that it was a Matchm atic model. On the Matchmatic, neither the shutter dial or the aperture displayed the traditional stop numbers (f16 and 1/100). Instead, they each have numbers from 4 to 8 for the shutter and 3/12 to 8 for the aperture. The Matchmatic made use of a selenium meter that attached to the camera with the accessory shoe on top. The meter would give a numberical exposure value, and then the user would set the shutter and the aperture to numbers that added up to the exposure value.  Of course, finding a working Matchmatic meter is difficult today. Fortunately, Matchmatics are still quite usable if you know what the numbers on the aperture and shutter dial represent, and, once again, some internet research reveals that the shutter speeds are:

4 = 1/10
5 = 1/30
6 = 1/60
7 = 1/100
8 = 1/300

. . . and the aperture settings are:

3/12 = f3.5
4 = f4
5 = f5.6
6 = f8
7 = f11
8 = f16


As I am yearning to be independent of a meter, using a camera like the C3 presents an opportunity to practice the art of judging light and exposure. It’s basic, back to roots photography, and that’s where I a, having the most fun. So, I loaded Kelley's C3 with some expired Kodak Max 800, which I am shooting at ISO 200 to account for its age. I’ve been shooting around Chattanooga and Atlanta. I’ll develop the film in the next day or so and post the results. Then I will decide whether or not I need to add a C3 to my collection.

Happy Thanksgiving and Happy Shooting!

Saturday, November 17, 2018

Kelley's Christmas Present: A Mystery Camera

Today’s Post is By Kevin Lane

Because I am a public school music teacher with a holiday program to produce in addition to a full schedule of teaching, I usually get behind in my Christmas shopping. However, I’m happy to say that I have already bought a few gifts for family, and one of those is for my brother, podcast partner, and co-author of this blog, Kelley. Now, Christmas gifts are usually surprises, but it will come as no surprise to Kelley that he is getting a camera for Christmas. He really likes cameras. A lot.

Of course, Kelley doesn’t really need another camera (neither do I, but . . .). His collection is growing constantly, and he owns some really nice ones at that. But as he has written in this blog, Kelley really hates to see a camera just sitting there on some antique or thrift store shelf when it could be doing what it is supposed to be doing. If the price is right, there is a good chance that he will “rescue” it. Although he has favorites, he actually shoots many of the cameras he owns. So, any camera that I wold give to Kelley for a Christmas gift would have to be one he could actually use.

Recently, as my wife, Debbie, and I were wondering around an area antique store, I spotted just such a camera, a camera I had never actually seen before. I picked it up and examined it carefully. It had good batteries in it and seemed to work as it should. Then, I got out my iPhone and began to search for information on the camera. I found a very positive review of it that especially noted the quality of the lens. It also noted that, because the lens could take a filter, it had become the reviewer's go-to black and white camera. Finally, I checked the price tag, and it was very affordable, unlike most antique store cameras. Decision made:  Merry Christmas, Kelley!

Shooting a test roll of film seemed like a good idea for this gift camera, so I loaded it with a fresh roll of Kodak Tri-X 400 and set out for nearby downtown Ringgold, Georgia. It was late afternoon, and the light was good. I tried to practice my skills of “finding things to shoot when there isn’t anything to shoot” and looked for patterns, stories, ironies, and anything that thought might be photo worthy. I am trying to learn how to “free my mind” and let things catch my eye. Sometimes I see something and say to myself, “No one else may appreciate this, but I do.” Click.

The mystery camera also accompanied me on a trip to Elijay, Georgia, a drive through Lookout Mountain’s McClemore's Cove, and a walk on the “industrial wastes” section of Chattanooga's Tennessee Riverwalk. After shooting the last frame on the roll, I processed the film using D-76 1:1, waiting for the negatives to dry, and scanned them. Right away, I noticed more grain than I usually get with Tri-X, so maybe I did something wrong in development (reticulation due to temperature disparity between developer and stop bath and/or fixer?). However, I was quite pleased with what the mystery camera can do.

Obviously, I can’t reveal anything more about this mystery camera until after gifts have been exchanged, but I can show you some of the photos. And yes, I there will be a “reveal” in a future post.

Happy Shooting!
Pumpkins (SOLD), Ringgold, Ga. 
Gray, White, Door, Ringgold, Ga.

Open, Ringgold, Ga.

Vintage Gathering, Ringgold, Ga.

No Parking USA, Ringgold, Ga.


Antique Checkers, Elijay, Ga.

Having By A Thread, McClemore's Cove, Ga.

Thursday, November 8, 2018

Uncle Jonesy's Cameras Podcast #4: Light Seals, Mirror Bumpers, Student Cameras, & Shooting Tips

Show #4 of the Uncle Jonesy's Cameras is now available for your listening pleasure! Spend some time with the Shutter Brothers (Kelley and Kevin Lane) as Kevin describes how he replaces the light seals and the mirror bumper on his newly-acquired Minolta XD-7.It takes patience and a steady hand, but you can do it, too (and if your cameras are as old as the ones we have, you probably need to.) It takes patience and a steady hand, but you can do it, too (and if your cameras are as old as the ones we have, you probably need to.)


Kevin's antique store XD-7 . . . 

 . . . with new seals and mirror bumper . . . 

 . . . that came from eBay!

Next, Kelley leads a discussion of what makes a good student-level camera. Of course, most people in film photography these days think of the Pentax K1000, but have you seen the prices lately? What other choices are "out there?"
Three excellent choices for student cameras, but "one of these
cameras is more expensive than the others."

Finally, Kelley and Kevin share their tips on finding suitable subjects for your photography. Hey, we all need inspiration sometimes, and the Shutter Brothers think that your inspiration might be closer than you think - maybe even on your drive to work. That's why membership in the Happy Shooting Club requires that you always carry a loaded camera with you. And, if you see something interesting that you know will not be there when you pass that way again, STOP and get it on film. As photographers, it's our civic duty!
An interesting juxtaposition that Kevin found worthy of photographing.

Kelley and Kevin would love to hear from all you listeners, especially if you have comments, suggestions, and questions. You can email us at unclejonesyscameras@gmail.com. Oh, and please subscribe to our podcast. That way, you'll never miss a show. And if you like what you hear, consider giving us a rating and a comment on iTunes. We really appreciate it (and you!) Happy Shooting!

Thursday, November 1, 2018

How "GAS" Made Me a Better Photographer


Note - Today's blog comes from the photographic adventures of Kelley Lane 
Ok, let me clarify that title.  It probably should read “How the Acquisition of One Particular Camera Made Me a Better Photographer.”  If you have spent any time with a film photographer, you would have learned that most of us suffer from this condition known as “Gear Acquisition Syndrome,” or “GAS” for short.  To put it simply, when I am out and about in flea markets, antique shops, or thrift stores and I come across a film camera that I do not already have in my collection, I have to actively battle the urge to rescue (purchase) the camera from its lonely and dusty surroundings, and give this fine piece of machinery a new home where it will be used, cared for, and appreciated.  Sometimes it is all I can do to make myself walk away from the table and not look back at the sad and orphaned camera still sitting with its price tag reading $10.00.  “All it needs is a good home” I think to myself as I deal with that special kind of quilt brought about by abandonment.  Kinda like visiting the dog pound on Adoption Day when you know the last thing you need is another mouth to feed.  “Why do I do this to myself,” I ask as I do an about face, head back to the table, and fork over the $10.00 to the smiling lady who looks as if she is saying “I knew you would be back.”

 A while back, however, I did purchase a camera from an antique mall that has really made a difference in my growth as a photographer.  The camera was a Kodak Retina 1B.  The Retina line was a series of cameras made be Eastman Kodak in their German factory.  A few of these models turned out to be really nicely made cameras with excellent lenses and exceptional build quality.  The Retina 1B is one of these with its Schneider 2.8 50mm lens and Compur leaf shutter.  But what really was special about this camera was the two things it didn’t have. 
Kodak Retina 1B

When I first started taking photos many years ago, I understood little about exposure technique.  My first really good camera, a Minolta XG-1 had an exposure meter and an auto exposure mode that I relied upon totally.  This was fine except that I always wanted to be able to look at the lighting and be able to set exposure without any help from a meter.  Of course I could have done that with the XG-1, but the auto exposure mode had become a crutch, and I didn’t have the knowledge or the confidence to go my own way.  This Retina 1B, is a fully manual camera with a full range of exposure settings, and though it has a light meter on board, it no longer is functioning.  So, when I first began to shoot with this camera, I carried a hand held light meter with me . . . again, no confidence in myself.  But using this light meter proved to be a complete distraction in my picture taking work flow, and I thought to myself, “Why can’t I just look at the light and make a judgement about the exposure?” I had heard of “Sunny 16,” but never felt the need to use this simple formula to set my exposure.  Maybe it was time I ditched the light meter habit and truly get in touch with how light and exposure works.
 Sunny 16 is a simple rule that goes like this.  If you are shooting on a bright sunny day with the sun behind you, simply set the aperture to F16, and the shutter speed to the setting that is the closest match to the speed of your film.  For example, if your film ISO is 100, set the shutter to 1/125 of a second.  Your camera is now ready as long as your subject is direct sunlight.  This part of Sunny 16 is easy . . . just shoot in bright sunlight.  But the real magic of this simple rule of exposure comes when the lighting is anything but sunny.  If you understand that each setting of the shutter or the aperture increases or decreases the amount of light reaching the film by multiples of two, then you now have a real guide to setting your exposure.  For example, if I’m shooting 100 ISO film and my subject is in bright sunlight, my shutter would be set to 1/125 and the aperture would be set to F16.  However, if my subject decides to step into the shade, I now have to increase the amount of light reaching the film.  How much, you say?  If I open my aperture to the next setting at F11, I have doubled the amount of light reaching the film.  If I go on to F8, the light has been increase by a factor of 4.  Each “stop” on my aperture going down from F16 doubles the amount of light.  I can now use this information to make a judgement on exposure now that my subject is no longer in bright sunlight, but now in the shade.  How much I actually increase the light that enters the lens depends on the subject (light or dark) and the background (reflective or non-reflective), but my basic rule of thumb is to increase the aperture by two stops (F8) when shooting in the shade.  If the background is dark, I might go three stops down (F5.6).  The key point is that I am now looking at light and, using Sunny 16 as a guide, I now can make an educated guess as to what my exposure setting should be.  In other words, I have now become my own light meter.  All I had to do was start paying serious attention to the amount of light illuminating my subject and decide how much (if any) I needed to increase the light reaching the film from the bright sunlight setting of F16.  It only took a few rolls of film to practice this method, and as it turned out, my “educated guesses” were more correct than incorrect.  This gave me the confidence to shoot away in all manner of lighting conditions without relying on a light meter.  Now I could use the many old cameras that I have collected that have no light meter. 


Kodak Retina 1B - Tri X 400 - Marietta, GA
 I owe this renewed confidence as a photographer to this little Kodak Retina 1B.  If I had never purchased this camera, I would probably still be shooting 35mm SLR’s and totally relying on the auto exposure mode.  There if nothing wrong with this, of course.  Sometimes it is nice shoot pictures and not thinks about exposure at all.  But being a good photographer means understanding how light works, just like being a good cook means knowing about ingredients and how much to use in preparing a meal.  When I look at a photograph I have made that came out really good, I get a great feeling knowing that I made the decision about exposure based on how I saw the light with my own eyes.  This makes my photos a more personal expression of how I saw my subject.  This is what “art” is all about.  So next time you see an old camera at a flea market or thrift store looking sad and lonely and begging to be taken home, try to be open to the possibilities of what this old camera might teach you about photography.  It could be the best $10.00 you have spent in while.
 
Next time, I'll tell you about the other thing this camera taught me.  Till then, "Let's get some pictures."

Kodak Retina 1B - Tri X 400 - Rome, GA


Kodak Retina 1B - Tri X 400 - Rome, GA

Kodak Retina 1B - Tri X 400 - Marietta, GA

Tuesday, October 23, 2018

Uncle Jonesy's Cameras Podcast Show #3 is (Finally) Here!


It took us long enough, but we finally have show #3 of the Uncle Jonesy's Cameras Podcast available for your listening pleasure. Kelley and I have a conversation about our go-to films and films we hope to shoot someday. Then we take a deep dive into exposure and our desire to become more independent of our camera meter. To this end, we mention a very influential book, The Nature Photographer's Complete Guide to Professional Field Techniques by John Shaw, the Black Cat Exposure Guide, and the Ultimate Exposure Computer. Finally, Kelley talks about a  flea market Konica. You can find the podcast on 
iTunesGoogle Play Music, and Spotify, and if you like what you hear, please subscribe! 

Kelley and I apologize for this show taking so long to deliver. Neither Kelley or I are procrastinators, and we both like to keep commitments. However, sometimes life just happens. Both Kelley and I have been quite busy with our day jobs, and we also have had family activities to keep us busy. Plus, Kelley has been super busy moving into a new house and trying to get his guitar shop up and running. So much for excuses . . .

I know it would be easy for anyone who has listened to the first two UJC podcast episodes to think that while we got off to a fast start, we might be one of those podcasts that can't keep the shows coming. We want you to know that Kelley and I are committed to this venture, and we intend to see it through. We also want you to know that we feel we make a better podcast by both of us being in the same room. Because of this standard we have set for ourselves, there may be times when we won't be able to record as much as we like. But we are NOT giving up, and we hope you won't give up on us. So please keep listening, and if you like what you hear, please share with your photography friends. You are the reason this podcast exists!

We would love to hear from you, so please email the podcast at unclejonseyscameras@gmail.com.

Saturday, September 29, 2018

That's Pushing It!

This post is about push-processing, a technique that will be very familiar to most experienced photographers. However, I had never tried it before, so you will have to excuse my excitement. If you are in the "experienced" category and know all about push-processing, you may want to skip the rest of this article. If not, then read on.

Someday I really would like to combine my music and photography interests by photographing live performances around town. My preference would be to shoot at small intimate venues like clubs and to use black and white. I had the chance to do this recently when an up-and-coming country music trio from Nashville called Campbell Station came to play a show at Songbirds in Chattanooga. Songbirds is a guitar museum housed in an old railroad station that has been converted into a hotel and entertainment complex. Songbirds has a small performance venue amongst the hundreds of vintage and rare guitars on display, and I thought this would be a good opportunity to practice my photography skills, especially since one of the members of Campbell Station is a former music student of mine.

The problem shooting musical performances, of course, is low light, and unless you are using ultra fast film (like Kodak TMaxx 3200), you really only have one option is to push-process your film. (You could, of course, use a flash, but that will get you kicked out of most venues today.) I had never push-processed film before, so I was a little anxious about trying for the first time on such a good photo opportunity. However, after doing a little research, I found that it is really quite easy, and I went for it.

Push-processing is a two-step process that essentially causes your film to think it is faster (more sensitive to light) than it really is. The first step takes place when you shoot the film. Instead of setting the film speed on your camera to box speed (the speed indicated on the box), you set your camera to a higher film speed.  For example, I chose to use Kodak Tri-X 400 film, but instead of shooting it at 400, I shot it two stops faster at 1600,  allowing me to use a fast-enough shutter speed to get sharp images of the group.  Of course, by doing this I was underexposing the film by two stops. That is what makes step two necessary.

Step two is two extend the developing time when the film is processed. Kodak publishes developing information for their black and white films online, so I found the technical data sheet for Tri-X (http://imaging.kodakalaris.com/sites/prod/files/files/resources/f4017_TriX.pdf) and found that my developing time for 1600 (using D-76 1:1 at 68ยบ) is 13 1/4 minutes instead of the usual 9 3/4 minutes. The other processing steps, stop bath and fixer), remain the same as usual.

Push-processing does have its costs, however. While you gain exposure latitude with push-processing, you also lose some image "quality." I put the word quality in quotes because the loss in image quality when using push-processing amounts to higher grain and contrast, and many photographers (including myself) like the increased amounts of grain and contrast in certain situations such as concert photography. I really like the way the Campbell Stations photos came out. I definitely will be using push-processing again in similar situations. It's great for me to know that I can use Tri-X 400 this way and count on getting images of which I am proud.

All of the photos below were shot with Uncle Jonesy's Minolta SR-T202 on Kodak Tri-X 400 pushed to 1600 and home processed.


Saturday, September 22, 2018

The Return of an Old Favorite

Once upon a time I was a decidedly Minolta person. The first SLR I ever bought was a Minolta XG-1, which I purchased new from a camera store in Atlanta with part of my first-ever teacher paycheck. Soon afterward I added a SR-T201. I shot dozens and dozens of rolls of film with those two cameras before the XG-1 froze up one day. That's when I began dreaming of owning a Minolta X-700. It was the coolest-looking camera in the Minolta brochures that I collected meticulously. Popular Photography, of which I was a devoted subscriber.
And that grip . . . and it was all black. Being a Minolta user, it seemed to be the logical choice for my next camera. Because we had two young children and a lot of future memories to capture, my wife was onboard with the idea, and ordered a brand new X-700 from a camera store that advertised in

My excitement was off the charts when the package arrived and I unboxed my new X-700, and I put it to use right away. There were so many things about that camera that I liked. Because of the afore-mentioned grip, no camera before (or since) felt so right in my hands. I also loved the touch-sensitive shutter button that activated the meter the moment your finger made contact with it (the meter also would shut itself off a few seconds after you took your finger off the shutter button, thus saving battery life.) Being able to see aperture and meter-selected shutter speed information in the viewfinder was really nice as well. However, I never used the camera's most noted feature:  programed exposure. When you set the camera for "P" for program, it would choose an appropriate aperture and shutter speed for a correct exposure, turning the camera into a manual-focused point-and-shoot SLR. I stuck to the same aperture-prioity metering that my old XG-1 used.
My daughters, Megan and Amber, and the Georgia folk artist,
Howard Finster in the mid 1990's. Taken with the X-700.
Nevertheless, it was this camera that recorded so much of my family's history (mostly on slide film). And did I mention that it was black?!

And yet, I eventually sold it and bought a Nikon FE from my brother, Kelley (who by this time was a Nikon user). Even now, I'm completely sure why, but I have given in some thought during this eighteen-month old film resurgence that I am currently experiencing. I think it may have had to do with the way the camera worked in manual mode. When you select a shutter speed manually, the camera shows what it thinks the shutter speed should be (using LED lights), but it does not show you what shutter speed you selected. You have to bring the camera down from your eye and look at the shutter speed dial to see what you have selected. Why Minolta left this out when designing their "top-of-the-line" camera beats me, especially when metered manual is found on the Minolta X-570, a camera that lacks the program setting. Even though I was striving to become a more creative photographer, I was still quite dependent on a meter. In the viewfinder of a Nikon FE, you see all exposure choices, and the camera shows you it's shutter speed suggestion with a match needle. And let's face it. I couldn't help but wonder if my Minolta lenses were up to the quality that Nikon is known for. I made the switch.

Recently, my wife, Debbie, and I were in Seattle visiting my youngest daughter when Kelley called to tell me that he had come across a clean X-700 on sale somewhere for $10.00 and bought it for me.
Not only did his thoughtfulness touch my heart, but also I was genuinely excited about using am X-700 again. These days I am much less dependent on a meter (thank you, Rolleicord), so the manual issue doesn't mean as much as it did. And yes, nostalgia has a lot to do with it, too. When Kelley gave it to me, it was like getting back an old friend. And it still felt good in my hands.

It also makes good photographs, as it turns out. The 50mm 1.7 lens is tack sharp, even though it is missing the rubber grip on the focus ring. Although my photography has been limited by the demands of the new school year, the X-700 has become my favorite 35mm at the moment, and the two Nikon bodies that I own haven't been used in two months. Hmmm . . .

Currently, the X-700 has some expired Fuji Sensia slide film in it, and I am looking forward to using the E-6 developing kit I bought from the Film Photography Project store. When Ektachrome reappears later this year, I believe it might the X-700 that gets first crack at it.


Cloud Reflections on the Westin, Chattanooga. Kodak Gold 200, self processed.

The new Westin Hotel in Chattanooga now occupies the former headquarters
of Blue Cross Blue Shield of Tennessee. Kelley and I always called it
the "gold building" growing up. Kodak Gold 200, self processed.


Bike for rent in Chattanooga. Kodak Gold 200, home processed.

Pool Party Friends. Kodak Gold 200, home processed.

Kelley and Marcie. Kodak Gold 200, home processed.


Thursday, September 20, 2018

Uncle Jonesy's Camera Podcast #2 is Here!

Kelley and I got together this week to record our second episode of the Uncle Jonesy's Cameras Podcast, and now the show is available for your listening pleasure. In this episode Kelley talks about why it is so important to know how to use your camera's self timer function and why you might want to carry a small tripod with you always.
A Minolta Trio
Kevin talks about three Minolta cameras that have been on his "want" list and how he actually acquired them in a very short time.
The Zenobia C
Next, Kelley has a camera for us that might be unfamiliar to most of you, the Zenobia C. Lastly, we reveal the name of the lucky listener who won a Minolta X-370.
The Zenobia C. Cool or Unclean? You decide!
And the lucky winner is . . . 
We're all about having fun with film photography at Uncle Jonesy's Cameras, and we hope that you enjoy this show.

You can find the show on iTunes, Google Play Music, and Spotify. We really hope that you will subscribe to the podcast so that you will not miss a single episode. And, if you would like to ask us a question or give us a tip, we would love to hear from you. All you have to do is email us at unclejonesyscameras@gmail.com. Also, we love iTunes comments! Please tell us what you think. Lastly, if you like the show, please spread the word about it. Kelley and I are quite passionate about sharing what we have learned about this great hobby, and you can help us spread the word. We thank you in advance!

Enjoy!

Monday, September 17, 2018

Uncle Jonesy's Cameras: The Podcast


Dear Readers,

First, thank you for reading. I appreciate that you take precious time to share in these adventures in film photography, and I hope that you get something out of the these articles that inspires you to have your own adventures and preserve them on film. In the very near future, my brother, Kelley, will be sharing the writing duties with me. I think you will really enjoy his perspective on film photography and gain from what he has learned. I know I will.

And now for the big news:  Kelley and I would like to announce the birth of a new film photography podcast called, appropriately enough, the Uncle Jonesy's Cameras Podcast. As of this writing, we have only one episode available, but new episodes will be posted soon. Our podcast can be found on iTunes, Spotify, and soon to be on Google Music. And if you are using a podcast catcher, you can access the podcast feed here.

We are aware of the explosion of film photography-related podcasts lately (we are fans of most if not all of them), so one might ask why should there be another one. Kelley and I hope to make our podcast very topic oriented. With our educator experience (Kelley is a former music teacher and I am one still) we are imaging our podcast to be like having a teacher handy to help our listeners to find their ways of film photography. We are not experts, and we make mistakes. But that's really the point. We want to share what we have learned from our successes and failures so that you can have more successes than failures. We also plan to devote some part of each episode to answering listener questions. You can send us your questions by email at unclejonesyscameras@gmail.com. You even can record a voice memo on your device and send it to us by email as well. We'd love to hear from you.

Please give us a listen, and if you like what you hear, please click or tap the Subscribe button so you won't miss an episode. And thanks is advance for listening!


Monday, September 10, 2018

One Camera One Lens Challenge

Dear Beloved Readers,

I want to begin this post with an apology (which is not the most positive way of starting this post, but it is quite necessary, as will be seen).

I haven't posted in over a month. My excuse? (Wait for it.) I am a public school teacher in northwest Georgia, and our summer ended on August 1. Now, I know that most of you do not get a two-month break in your job, but, on the other hand, MARTA bus drivers in Atlanta receive a hight hourly wage than most public school teachers, so there's that. Back to my excuse. The beginning of a school year is very time consuming, and I simply haven't been able to devote any time for blog writing until now. I want you to know that I value you readers more than you will ever know, and you deserve regular, if not high quality, content (actually, you deserve that, too). Hopefully, I will keep a better schedule now that the school year is underway.

Now back to our regularly scheduled blog post.

At the end of July my wife, Debbie, and I traveled by air to Seattle to visit our daughter, Amber, and her partner, Matthew. We had a wonderful and memorable time visiting these two very special people, and, of course, I planned to shoot some film while there. My original plan was to go the safe route by bringing my two Nikon bodies (an FE and an FM2n - one for B&W and one for color), a 28mm and a 105mm lens, and as much 35mm film as I could carry in my backpack, which was the only luggage I planned to take. I knew it would be heavy, but I was confident I could deal with it.

Then I read somewhere online (I wish I could remember where) of someone taking the "one camera one lens challenge," whereby one only packs one camera and one lens for a trip. I couldn't help but think about how much easier that would be for me, but I was really intrigued by the challenge of tying to meet all my photography goals with just one camera and one lens. And it didn't take me long to choose one camera and one lens. My Rolleicord Va.

Talk about challenge! A sixty year-old camera with a fixed focal length lens with no meter that takes more expensive film, a roll of which only yields twelve exposures. Was I crazy? Who knows when we will be able to visit Seattle again? Certainly not anytime soon. This was risky, and I was in.

Actually, it was quite fun. I enjoyed getting to know the Rolleicord, which, as a twin lens reflex camera, required a much different workflow than what I was used to with SLR's. I also liked being forced to evaluate light and exposure settings without a meter (I did occasionally use the Lightmeter app on my iPhone, but mostly I used "sunny 16.") And, I love the square format and the larger negatives.

As I moved about in Seattle, I could not help be think about Vivian Meier. If you have not heard about her, then do some research. I am an unabashed fan of her work (more about that in a future post).
However, using a camera similars to hers (she use several Rolleiflex models) was daunting. Certainly for me, the camera slows the photographic process way down. Judging the light, setting exposure, focusing (in reverse), and composing all must take place before pushing the shutter button. Yet, Vivian Meier was able to shoot more film in afternoon than many of us shoot in a month. And her results? Well, like I said, do some research.

Of course, my prime objective was to have fun and do the best I could to make some quality photographs. And I did. At least the fun part. The photos? I like them. That's all that matters to me.

All photos were home processed and scanned on an Epson V500 using the Epson software.

Photographed it and rode to the top. Kodak Ektar 100
The ferry ride to Bainbridge Island was great. Kodak Ektar 100
Double self portrait with Space Needle, Chihuly Garden and Glass. Kodak Portra 160.

Flowers outside our Foos River cabin. Kodak Portra 160.

Stacked rocks along Deception Creek. Kodak Tri-X 400.

Hotel, Skykomish, WA. Kodak Tri-X 400.
The Great Northern & Cascade Railway, Skykomish, WA. Kodak Tri-X 400


Totem Pole, Pioneer Square, Seattle, WA. Kodak Tri-X 400.